Sunday 7 June 2009

Rear braided brake hoses

We purcashed some braided rear brake hoses to replace the rubber ones from Goodridge, but I can't figure out how to fit them!

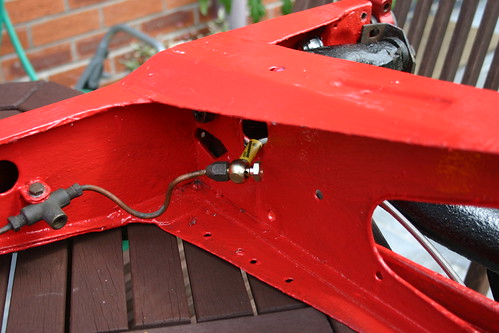
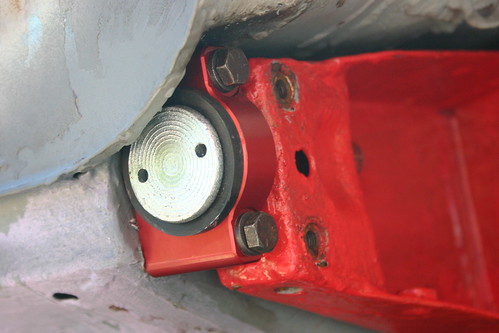
I presume that the banjo bolt goes to the subframe end, but I can't figure out the best way of routing this. If I route it as below it a) doesn't seem right and b) won't reach the wheel cylinder!

I've posted a question on the Mini forum at http://www.theminiforum.co.uk/forums/index.php?showtopic=126813 so we'll see if any of the helpful folk on there can shed any light.

Fitting the new rear subframe

Today was at long last the day to refit the rear subframe. It seems like a long time ago that I dropped the rusty old one down from the car (because it was).

After our trial run last week I was confident that things would go smoothly. It was quite plain sailing as I had to remove the rear trunnions to get it past the rear valance, but after another period of levering (and cursing at the sky as it started to rain) it all went in.

Before fitting the subframe I painted the top of it and the vunerable areas with waxoyl and I made some mounting pads out of neoprene. These get sandwiched between the subframe and the car and help to prevent noise and vibration.

The new bolts were all also liberally doused in copper grease to make removing them in future easier.


Next I need to rebuild the rear radius arms and then move onto sorting the floorpans properly.

Painting and undersealing

Oh joy, my favourite job! Painting the underside of the car and undersealing it, I hate it!

Thankfully it wasn't too bad with two of us working on it, and now the underside is nice and black. We used the hammerite brushable underseal "with added waxoyl" to give it a bit of protection.

It seemed a shame to underseal over the nice new paint, but since this car is going to be used I think it's worth it.

Trial fitting the rear subframe

After welding in the new OS rear subframe mount last week I was finally ready to trial fit the subframe.

I was quite aprehensive about this, because even though I'd taken lots of measurements and made a jig, there was no 100% guarantee that things would line up given the amount of metal that had been replaced.

We jacked the subframe into position and after much levering and cursing, it all went in no problem!

The holes all line up perfectly thankfully.

Trial fit

Instead of re-using the old trunnions, we also fitted billet alloy trunnions from www.dsnclassics.co.uk.

Sunday 24 May 2009

Back to the grindstone

Hard to believe that it's been 8 months since any Mini action, but after the RSI-induced welding ban and the endless English rain I didn't get much opportunity to work on the car.

Well today we started again, it was sunny for a change so we decided to press on with the rebuild. Today my angle grinder broke and I'd run out of sandpaper so any bodywork was out of the question, so instead we decided to get the new subframe ready for build-up and refit.

It needed a new coat of paint first, so after much umming and ahhing we opted for a bright shade of Ferrari red.

Now it's nice and shiny :-) Next job is to rebuild the rear arms and fit the rebuilt brakes, by which time I might even have got the rear of the bodyshell ready to fit it!

Red subframe